
If you are a fan of classic gaming, you’ve likely encountered the PCSX ReARMed core. As one of the most efficient PlayStation 1 emulators, particularly for ARM-based devices like the Raspberry Pi, Odroid, or even mobile phones, it brings 32-bit nostalgia to the palm of your hand. However, the most common roadblock for gamers isn’t the software itself—it’s the dreaded “BIOS not found” error.
At Psbios Zone, we understand that you want to spend your time playing Metal Gear Solid or Final Fantasy VII, not hunting through obscure system folders. In this comprehensive guide, we will break down exactly where the PCSX ReARMed BIOS location is, why it matters, and how to ensure your setup is flawless.
Why Do You Need a BIOS for PCSX ReARMed?
Before we dive into the file paths, it is important to understand what the BIOS actually does. The BIOS (Basic Input/Output System) is the original firmware found inside a physical PlayStation 1 console. It acts as the bridge between the game software and the hardware.
While some HLE (High-Level Emulation) versions of PCSX ReARMed can run games without a BIOS, they often suffer from:
- Poor Compatibility: Many games simply won’t boot.
- Glitched Audio: Music and sound effects may crackle or vanish.
- Missing FMVs: Those iconic pre-rendered cinematics often fail to load.
- Save File Corruption: Memory card stability is significantly lower without original firmware.
To get the “Authentic” experience, you need the official Sony BIOS files.
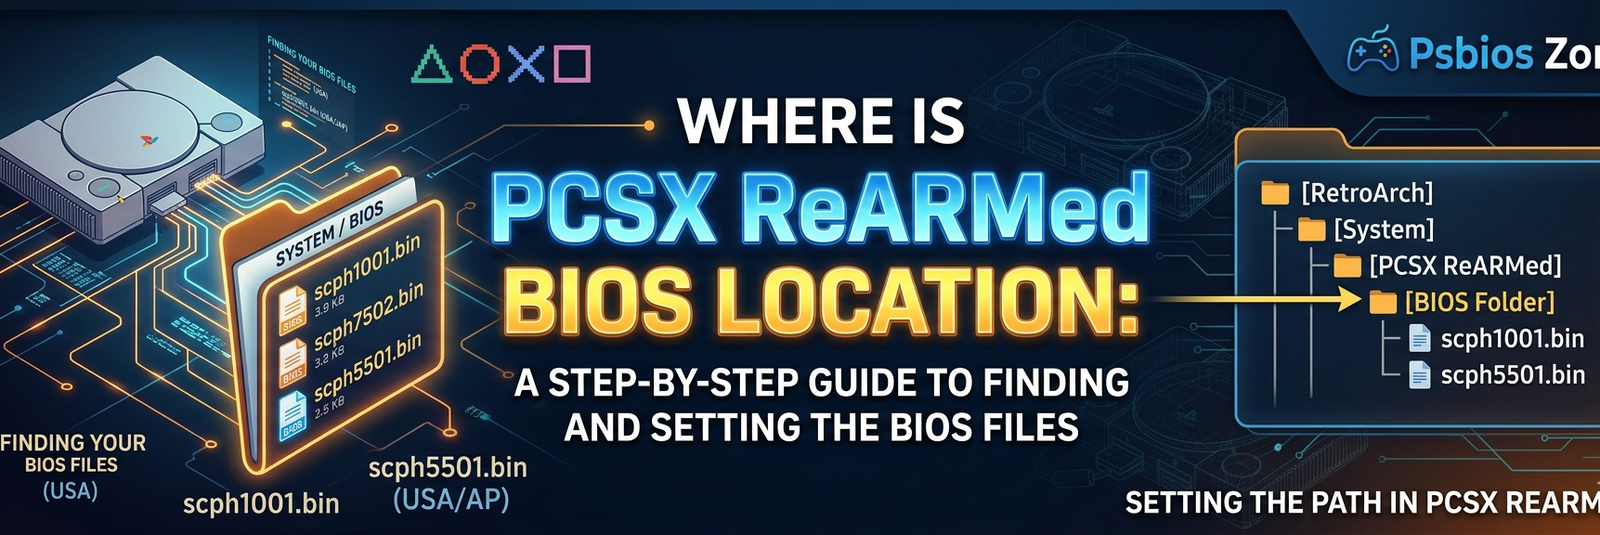
Essential BIOS Files for PCSX ReARMed
Before you look for the folder, ensure you have the correct files. The emulator looks for specific filenames (case-sensitive). At Psbios Zone, we recommend having these three “gold standard” files:
| Region | Recommended Filename |
| Global/All | scph5501.bin (Most Compatible) |
| North America (NTSC) | scph1001.bin |
| Europe (PAL) | scph7502.bin |
| Japan (NTSC-J) | scph5500.bin |
The PCSX ReARMed BIOS Location: Where Does it Go?
The location of your BIOS depends entirely on the “wrapper” or frontend you are using to run the PCSX ReARMed core. Most users access this core through RetroArch, Lakka, or Retropie.
1. RetroArch (The Most Common Setup)
If you are using RetroArch on Windows, Android, or Linux, the PCSX ReARMed BIOS location is almost always the system folder.
- Windows:
RetroArch/system/ - Android:
/storage/emulated/0/RetroArch/system/ - Linux/Ubuntu:
~/.config/retroarch/system/
Pro Tip: You can verify this path within RetroArch by going to Settings -> Directory -> System/BIOS.
2. RetroPie (Raspberry Pi Users)
For those building a dedicated retro console on a Raspberry Pi, the path is slightly different. RetroPie uses a centralized BIOS folder for all its emulators.
- Path:
/home/pi/RetroPie/BIOS/ - Note: Do not put the BIOS inside a “PSX” subfolder unless specified; keep it in the root of the BIOS directory.
3. Batocera / EmulationStation
Batocera is highly organized. If you are using this OS, the PCSX ReARMed BIOS location is:
- Path:
/userdata/bios/
How to Install the BIOS Correctly
Following these steps will ensure that Psbios Zone users never see a black screen again:
- Obtain the Files: Ensure you have legally dumped your own BIOS files from your PS1 console.
- Rename to Lowercase: Many Linux-based systems (like RetroPie) are case-sensitive. Ensure your file is named
scph5501.bin, notSCPH5501.BIN. - Transfer the Files: Use a USB drive or SFTP (like WinSCP) to move the files into the locations mentioned above.
- Verify in Core Options: Open RetroArch, load the PCSX ReARMed core, and go to Information -> Core Information. It will list the BIOS files and tell you if they are “Present” or “Missing.”
Troubleshooting Common BIOS Errors
Even after finding the correct PCSX ReARMed BIOS location, you might encounter issues. Here is how to fix them:
“BIOS Found but Game Won’t Boot”
This is often a “checksum” error. Not all .bin files are created equal. If your BIOS file is corrupted or a “bad dump,” the emulator will reject it. Ensure your file size matches the standard 512KB.
“RetroArch Doesn’t See the BIOS”
If you’ve placed the file in the system folder but RetroArch still says “Missing,” check your Directory settings. Sometimes RetroArch defaults to a temporary folder rather than the one you are looking at.
“Zip or No Zip?”
Never leave your BIOS files inside a .zip or .7z archive. Unlike game ROMs, the PCSX ReARMed core cannot read compressed BIOS files. They must be extracted .bin files.
Performance Enhancements After BIOS Setup
Once you have successfully configured the PCSX ReARMed BIOS location, you can start tweaking the core for better visuals. At Psbios Zone, we recommend enabling Enhanced Resolution (Slow) and Speedhack in the core options. This allows you to play PS1 games at a higher internal resolution, making those 1990s polygons look crisp on modern 4K screens.
Final Thoughts from Psbios Zone
Setting up an emulator can feel like a chore, but finding the correct PCSX ReARMed BIOS location is the single most important step in the process. It ensures that your favorite childhood games run exactly the way the developers intended—without glitches, crashes, or missing music.
Whether you are using a Raspberry Pi for a portable build or a high-end PC, remember that the system folder is your best friend. Keep your filenames lowercase, verify your directories, and you’ll be hearing that iconic PlayStation startup sound in no time.
For more guides on emulation and firmware, stay tuned to Psbios Zone, your home for classic gaming optimization!